Prepare the safe path
- Create a QueryWarden device with macOS or iPhone/iPad selected.
- Use a device you administer and review every profile detail before installation.
1 Download from the selected device
Open Devices, select the Apple device, expand Connection setup, and download the Apple configuration. The file is generated for that device endpoint. A completed download does not install the profile or activate QueryWarden DNS.
2 On current macOS, open the pending profile
A “Profile downloaded” message means approval is pending and DNS is not active. Open Apple menu → System Settings → General → Device Management → Downloaded, then select the QueryWarden profile.
3 Use the macOS fallback when the pending item is missing
Open Finder → Downloads and double-click the QueryWarden `.mobileconfig` file, then return to Device Management. On macOS 12 or earlier, use Apple menu → System Preferences → Profiles and select the downloaded profile.
4 On iPhone or iPad, use the iOS settings path
Do not use the macOS Device Management path. Open Settings → Profile Downloaded. If that entry is absent, open Settings → General → VPN & Device Management and select the QueryWarden profile.
5 Review and approve installation
Confirm that the display name references QueryWarden and the DNS payload uses the expected HTTPS endpoint, then choose Install on the intended device. Administrator or device-passcode confirmation may be required. Apple will identify the current distribution as unsigned; signing can improve publisher verification but does not automate installation.
6 Check for a request recorded after setup
Return to QueryWarden, select Start traffic check, and open a new destination on the Apple device. Existing or cached activity from before the check began does not satisfy it.
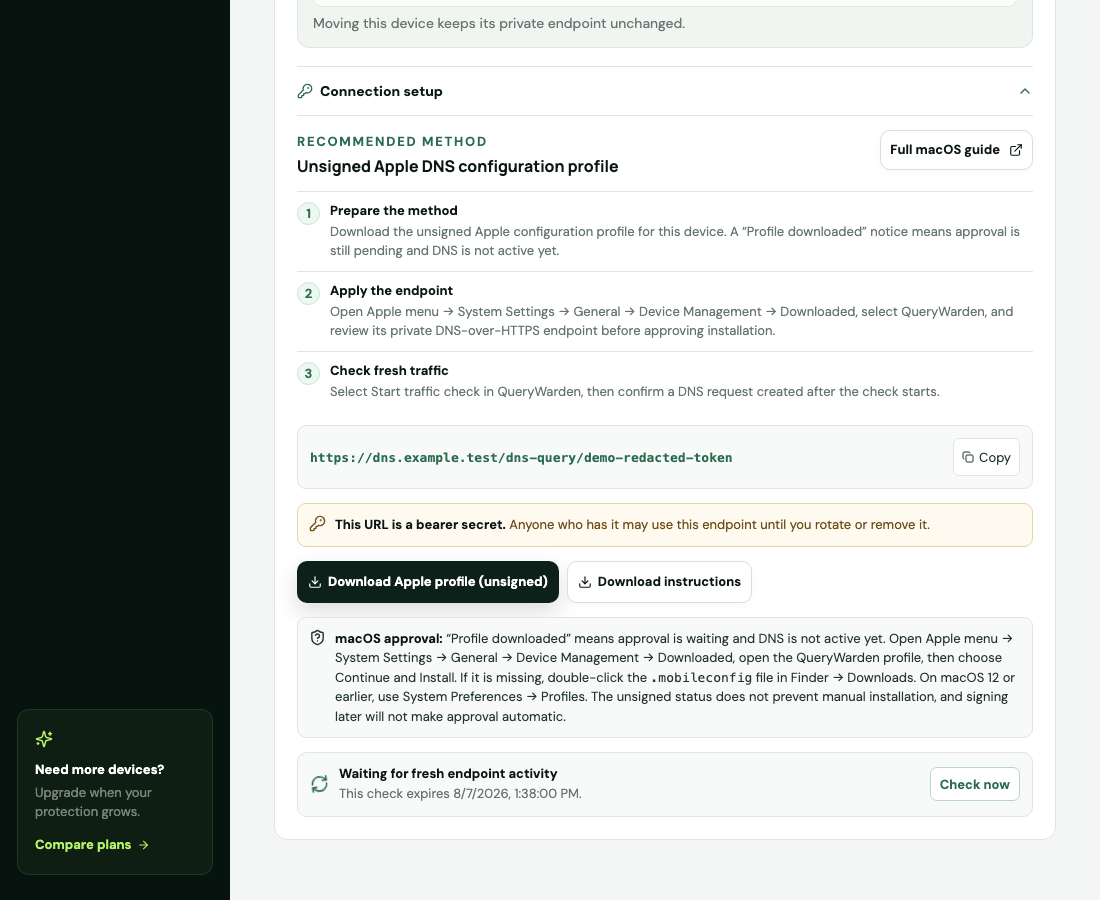
Connection setup provides platform guidance and verifies traffic recorded after the check begins.
Confirm the result
The device reports recent activity and the Apple device uses its private QueryWarden DoH endpoint.
Protect the account while you work
- The downloaded file contains the private endpoint. Store and share it as sensitive configuration.
- To remove it on macOS 13 or later, open Apple menu → System Settings → General → Device Management → QueryWarden DNS profile → Remove and confirm. On macOS 12 or earlier, use Apple menu → System Preferences → Profiles → QueryWarden DNS profile, then choose the remove (−) control.
- On iPhone or iPad, use Settings → General → VPN & Device Management → QueryWarden DNS profile → Remove Profile. Keep this mobile path distinct from the macOS path.
- A managed Apple device can reject user-installed profiles under organization policy. Ask the device administrator to approve or deploy the configuration instead of bypassing the restriction.
When the expected result does not appear
The Mac says “Profile downloaded,” but QueryWarden DNS is not active.
The notification confirms only that approval is pending. Open Apple menu → System Settings → General → Device Management → Downloaded, select QueryWarden, and complete the review and installation prompts.
The Mac does not show Downloaded in Device Management.
Open Finder → Downloads and double-click the QueryWarden `.mobileconfig` file. Check Device Management again, or use Apple menu → System Preferences → Profiles on macOS 12 or earlier.
Apple reports that the profile is unsigned.
This is expected for the current QueryWarden download. Confirm the source and endpoint before choosing whether to proceed. Signing would improve identity assurance but would not make installation automatic.
A managed device rejects the profile.
An organization MDM policy may restrict user-installed DNS profiles. Do not bypass it; ask the device administrator to review or deploy the configuration.
The traffic check remains pending.
Generate a new DNS request, confirm the profile is enabled, and check that source-IP access permits the device’s current public address.